
Good morning and welcome to another great Wednesday with Heartfelt Creations. Today I'm sharing with you another Christmas card using some beautiful images from Heartfelt Creations. I don't know about you but I love this "Lace Border" die, it just adds so much elegance and detail to my projects.


Angelica
Supplies:
Heartfelt Creations
HCPC 3417 Poinsettia Ornament 2 PreCut Set
HCPC 3426 Snowy Winter Background PreCut Set
HCPC 3419 Holiday Poinsettia Candle PreCut Set
HCD 713 Lace Border Die
Spellbinders Layered Poinsettia
Spellbinders 2011 Heirloom Ornaments
Inks: Ranger Archival Ink (Jet Black), Distress Ink (dusty concord), VersaMark watermark ink
Paper: Cardstock, DCWV (Old World Stack), Making Memories
Accessories: Spellbinders (Labels Fourteen), Want2Scrap steel blue adhesive rhinestones, Ranger holographic embossing powder, Stickles (Diamond), ribbon, Diamond Glaze, Bronze filigree metal corners, Bronze filigree metal embellishment, pop dots
Instructions:
Size: 8 1/2" x 5 1/2"
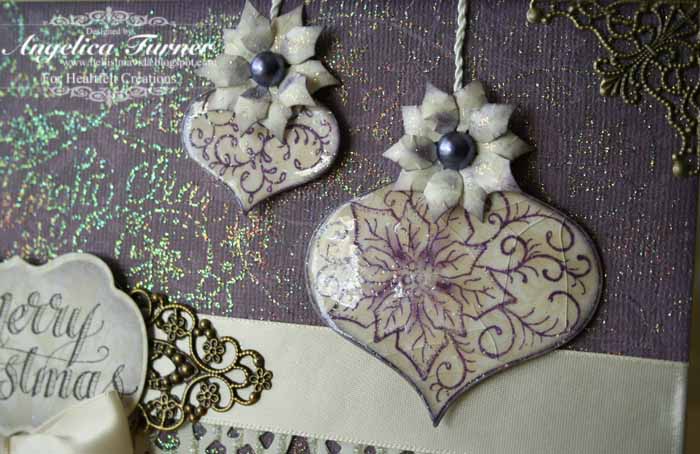
Cut a piece of purple patterned paper, stamp "Snowy Winter Background" image all over paper with watermark ink and heat emboss with holographic embossing powder, ink edges with dusty concord distress ink. Using the "Lace Border" die cut a couple of sections from a contrasting color patterned paper and adhere as pictured. Stamp the two smaller ornaments from "Poinsettia Ornament" set on a cream colored patterned paper with dusty concord distress ink and heat emboss with holographic embossing powder, cut with coordinating die, apply a layer of Diamond Glaze. Stamp sentiment from "Holiday Poinsettia Candle" set on cream colored patterned paper with black ink, cut and emboss with "Labels Fourteen" die, before removing die, ink slightly with dusty concord distress ink. Cut 4 of the small poinsettias with the die from "Layered Poinsettia" set, ink slightly with distress ink and shape with embossing tools. Adhere everything as pictured, add some ribbon and bow. The ornaments and sentiment label are adhered with pop dots for dimension. The filigree embellishment behind the sentiment tag I cut in half and placed on either side of the tag. Add a couple of filigree corners and adhesive pearls.
Another amazing creation. I love the colors!
ReplyDeleteGorgeous! I too love the lace border! Also love the background you stamped!
ReplyDeletegorgeous, love how you used the lace border, well done!!!!
ReplyDeleteGorgeous card, Angelica! I love the shiny ornaments and the lace border!
ReplyDeleteAngelica, your projects on this weeks HC post are awesome! Beautiful!
ReplyDeleteI like the music you've attached to your blog. How did you do that?
Happy Thanksgiving!
Clare
A beautiful card! Love the way you used the lace border.
ReplyDeleteSo elegant and beautiful, Angelica! LOVE the crackle finish on the ornaments. :)
ReplyDeleteTotally gorgeous!!! "Hugs"
ReplyDeleteLove the gorgeous colors you chose for this! Love how you used the lacy border!
ReplyDeleteSo many things to love about this. The hologram EP background is wonderful. The cracked glass ornaments, the crimped lace....
ReplyDeleteAngelica this is stunning. I really love the color you did the card in. So pretty and eye catching.
ReplyDeleteBear Hugs,
Carol
Very pretty & I love the colors.
ReplyDeleteHola, la tarjeta te ha quedado genial, me encanta el efecto craquelado que le has dado a las bolas de navidad!
ReplyDeletebesos