
Good Morning Friday, hope everyone had a good week and is ready to welcome the weekend. Today I have a little tutorial on making this vintage inspired mini canvas with a stamp from Stampin' D'Amour. I used lots of fun goodies, some feathers, a crochet flower I made a while back, a pin I made with some beads I found in my bead stash, anyways, hope you like the tutorial.


I started by picking 2 acrylic paint colors that would contrast and look good together for the crackle finish.

Start by painting your mini canvas with the burnt umber color acrylic paint, let dry or dry with a heat gun.

Apply a coat of crackle medium and follow instructions on the bottle, mine calls for a nice even coat and let dry until the medium is tacky to the touch.

Apply a coat of contrasting paint, for mine I used this color called bone, I didn't want to wait for the air drying so I used my heat gun to dry the canvas.

Ink edges with walnut stain ink.

Stamp image on cream cardstock with blazing red StazOn ink.

Distress edges with a distress tool, this one is my favorite.
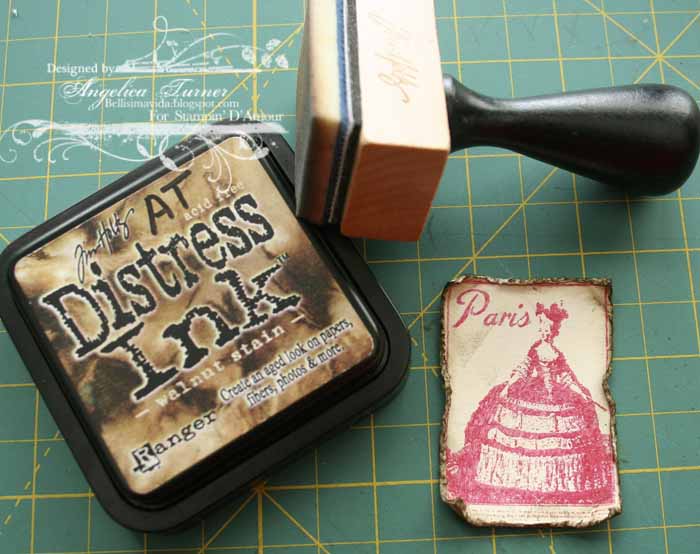
Ink edges of image with walnut stain ink for that extra distressed look.

Diecut the Spellbinders border from red cardstock.

Cut the border in small sections to make a frame around the stamped image.

Glue the sections to the image, make sure to trim the corners of the pieces you are using on the corner.

Here is the final image with the lace border completed.

I mixed some Golden gloss gel medium with Pearl Ex powder and painted a mulberry rose.

Before the medium dried I put some Diamond Dust on the rose, I love the look this adds to my flowers.

I used a Quickutz die to cut some leaves from glitter cardstock.

Using a embossing tool, I shaped the leaves to give them some dimension.

I added some pop dots to the stamped image for dimension.

Adhere a couple of feathers, the crochet flower and painted rose, the leaves. I also made a pin with some beads I had in my stash. As a final touch I added some gold Stickles to the stamped image and the crochet flower.
Supplies:Stamps; Stampin' D'Amour (French Vintage)
Inks; StazOn (Blazing Red), Distress Ink (walnut stain)
Paper; Bazzill Cardstock, cream cardstock, DCWV Glitter paper
Other; 4" x 4" Canvas, Stickles (Golden Rod), Quickutz leaves die, Tim Holtz Distressing tool, Spellbinders Classic Lace Border, Wild Orchid Crafts mulberry wild roses 30mm, Pearl Ex (689 Blue Russet), Diamond Dust, Golden Gel Medium (Regular Gel Gloss), Delta Crackle, Acrylic paint (Burnt Umber, Bone), feathers, handmade crochet flower, pin, beads, pop dots, Cuttlebug Machine.
Stunning canvas and excellent tutorial! I think you may have inspired me to try something similar.
ReplyDeleteunbelievable, so gorgeousness, made my eyes pop with desire. I love your little tutorial as well. Be bookmarking this page for sure to try these technique later on. I would have never thought to cut the border dies, but then I am still learning. I love your work, thanks for sharing on your blog
ReplyDeleteAngelica - this is just stunning! I LOVE the technique with the rose, that is fantastic (and probably less expensive than Prima Flowers). Thanks again for a another terrific tutorial!
ReplyDelete-pamela
Love, love, love this!! You are the queen of altered items!! Great job!!
ReplyDeleteThis was fantastic!!!! Thanks for sharing!!!
ReplyDeleteExquisite detail here - very inspiring - popped over from CCG - lovely card you did this week!
ReplyDelete