
Hi friends, I have been playing with the Happy Camper Collection from Heartfelt Creations and had so much fun creating this little shadow box scene.


Angelica
Size: 6 1/4” x 6 1/4”
Supplies:
Heartfelt Creations and Supplies Carried by HC
Inks: Distress ink (twisted citron, evergreen bough, mowed lawn), Ranger Archival Ink (Chrome Yellow)
Image Colored With: Prismacolor Color Pencils (Blue Lake, Ultramarine, Blush Pink, Peach, Orange, Lemon Yellow, Hot Pink, Crimson Red, Cool Grey 30%, Black, Burnt Ochre, Terra Cotta, Non-Photo Blue, Light Aqua, Apple Green), OMS Uni-ball Signo White pen
Paper: Bazzill Cardstock (Green), AW Curious Iridescent Cryogen White 89lb. Cardstock
For more tips on creating with the Happy Camper collection watch the tutorial at: https://youtu.be/FpXtNYGV-3Y
For more tips on creating with the Shadowboxes watch the tutorial:
Instructions: Finished size of shadow box is 6 1/4” x 6 1/4”. Take shadow box base and cut teal patterned paper panels to fit the sides and front as pictured, glue to base. Cut a scene panel for the inside background of shadowbox, add some glue to top edge of panel and glue to base. Cut 3 pieces from green cardstock with border dies from Fleur Border set (these pieces will make the little mountains in the scene), shade with green ink and glue to the 3 flaps on the shadowbox base.
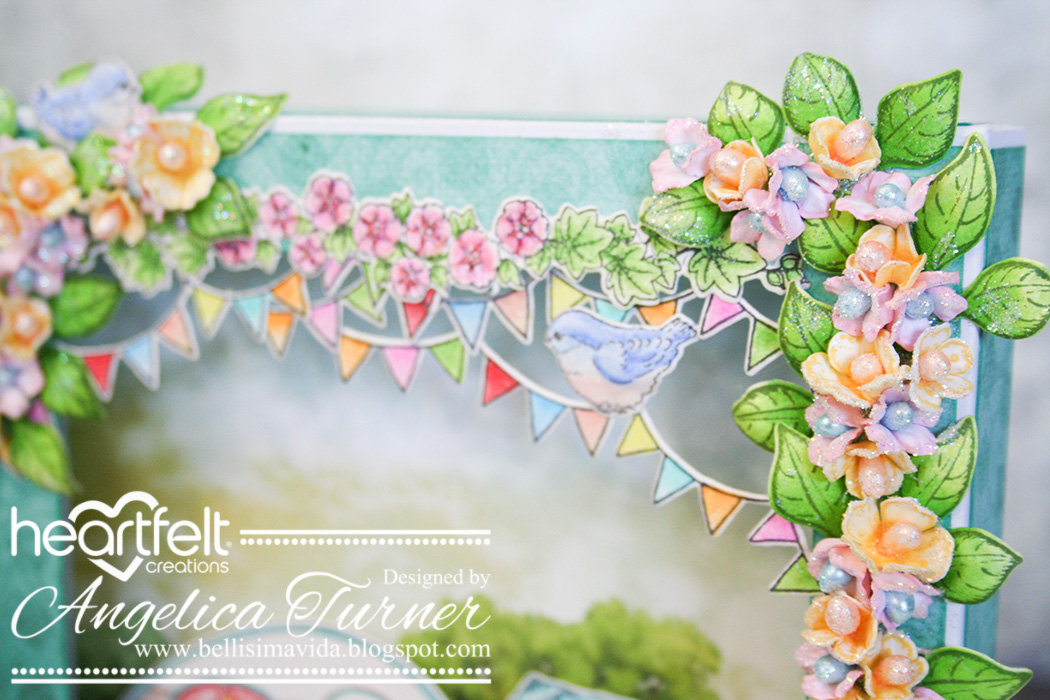
Stamp the following images on white cardstock with black ink, 2-campers, yard table-umbrella set, planters, scooter, drink bucket, fire pit, flower border, dog, birds, welcome signs. Stamp several of the fences, flower plants, flag banners. Cut all pieces with coordinating dies, color all images with color pencils.
Stamp all flowers and leaves on Deluxe Flower Shaping paper with the following inks - Floral Fashionista flowers with pink ink, Cherry Blossom flowers with yellow ink, leaves with Olive green ink. Cut with coordinating dies, shade flowers with same colors as stamped. Shade leaves with mowed lawn and twisted citron distress inks. Shape all flowers and leaves with coordinating 3D shaping molds, finish off shaping with Flower shaping kit. Add flower stamens to all your flowers.
Create a scene with all your images, glue them to the 3 layers on your shadowbox base, for some of the images I used small foam dots to give them more dimension. Close shadow box and secure flaps with glue, add a panel of patterned paper to back of shadow box.
Glue banner flags, flower border to front of shadow box, create an arrangement with the flowers and leaves on either side of the banners as pictured. Glue 2 little birds as pictured. Add a touch of glitter to flowers.
Love this gorgeous shadow box Angelica! The papers you designed for this collection are beautiful, as always!
ReplyDeleteGorgeous!
ReplyDeleteAmazing!
ReplyDelete