
Hi everyone, today we are doing a cross promotion with Scor-pal. Please visit the Heartfelt Creations blog here and the Scor-pal blog at here. Prepare to be blown away with all the amazing projects featuring the Scor-pal and Heartfelt Creations products.
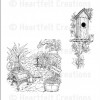
My project today is a shadowbox card I created with the newest collection from Heartfelt Creations "Gateway To The Seasons" and the Scor-pal scoring tool. To make the shadowbox I used this great tutorial from Scor-pal here.


Angelica
Supplies:
Heartfelt Creations


Inks: Ranger Archival ink (Jet Black), Versafine (Onyx Black), Distress ink (walnut stain)
Image Colored With: Prismacolor Color Pencils (Cool Grey 10%, Cool Grey 70%, Cream, Peach Beige, Light Umber, Sienna Brown, Dark Brown, Pink Rose, Magenta, Apple Green, Kelly Green, Grass Green, Olive Green, Dark Green), Odorless Mineral Spirits, Marvy LePlumeII (Silver Grey, Black, Bubble gum pink, olive green, mocha), Pebbles Ink. Chalks (Basic Brights)
Paper: Bazzill Cardstock (Brown, Cream), Crafter's Companion 80lb. Ultra Smooth white cardstock
Accessories: Scor-pal, Spectrum Noir marker (TN2), Hand dyed seam binding, Adhesive pearls, pop dots, Pearl stick pin, beads, metal bead findings, jump ring
Instructions:
Size: 5 7/8" x 6"
Create shadowbox card base with cream cardstock, I used this wonderful tutorial from Scor-pal, you can find it here. Cut a piece of patterned paper to cover front of card, ink edges with walnut stain distress ink. Stamp image from "Spring Season" set on white cardstock with black ink twice, color 1 image completely, on the second image color only the chair and flower container with welcome sign, cut these two items with scissors. Trim image to fit card window, adhere, adhere chair and flower container with pop dots for dimension. With dies from "Ornate Gateway" cut the gate from brown cardstock, adhere as pictured. Cut large tag with die from "Decorative Flower Pot" die set from brown cardstock. Stamp "All Seasons Sentiments" on cream cardstock with black ink, cut your favorite sentiment words, ink edges with distress ink, adhere with pop dots to tag. Add seam binding and bow, use jump ring to attach tag to bow, add a decorative stick pin, I made mine with a crystal bead and metal findings. Add a few adhesive pearls.
So beautiful
ReplyDeletegorgeous, I love the tag and stick pin too!!!
ReplyDeleteJust Gorgeous.
ReplyDeleteBeautiful, such lovely scene, like the fence black and such a pretty pin!
ReplyDeleteGirl, you can color...that is for sure! Absolutely gorgeous! I love all the special little touches...the popped up elements, the sweet tag hanging from the gorgeous ribbon and that elegant stick pin. Wonderful!
ReplyDelete